
この記事では、マネタイザーに登録した方に向けて、登録方法や必要な初期設定を解説しています。
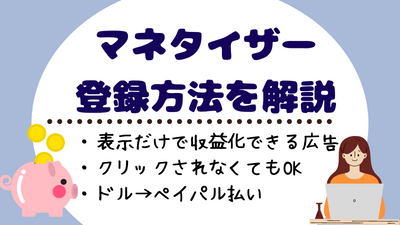
The Moneytizer(ザ・マネタイザー)とは、広告の表示回数(インプレッション数)によって収益が発生するサービスです。

The Moneytizer(ザ・マネタイザー)とは…
◆広告をクリックされなくてもOK
◆Googleアドセンスと併用もOK
◆収益は50ドルたまってから振込み
(ペイパル払いか外国の銀行口座)
この記事では、The Moneytizer(ザ・マネタイザー)の登録の仕方を画像付きで解説していきます。
①アカウント登録(約10分)
②ads.txtの設定をする(約15分)
③CMPの設定をする(約15分)
→サイトの審査合格後に広告を貼ることができる!
時間は、わたしがかかった目安です。①、②、③は続けて行わなくてもOK。
お時間がある時に少しずつ進めることができます。
\今なら審査通過だけで5ドルもらえます/
既に登録が終わっていてマネタイザーの広告の貼り方を知りたい!という方はこちら

マネタイザーの報酬振り込みについてはこちら

The Moneytizer(ザ・マネタイザー)登録前の事前準備
この項目はとばしてもOKですが、しておくと後で楽になる設定です。
1 ペイパルに登録する
The Moneytizer(ザ・マネタイザー)の支払いは、外国銀行口座かペイパルの支払いになります。
わたしは日本の口座しか持っていないので、ペイパル支払いにしました。
ペイパルをお持ちではない方は、事前に準備しておくとあとでスムーズです。
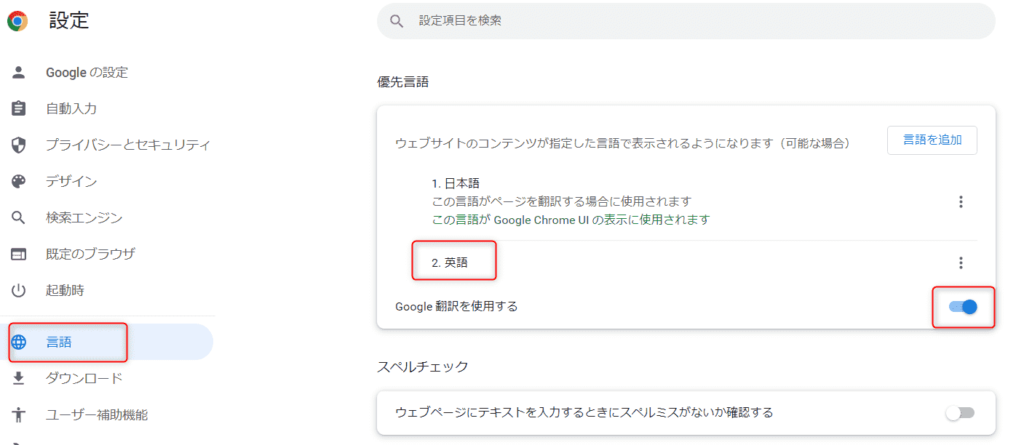
2 日本語翻訳機能を使う
The Moneytizer(ザ・マネタイザー)は英語表記のサイトですが、Googleをお使いの方は以下の設定で日本語表記にかえることができます。
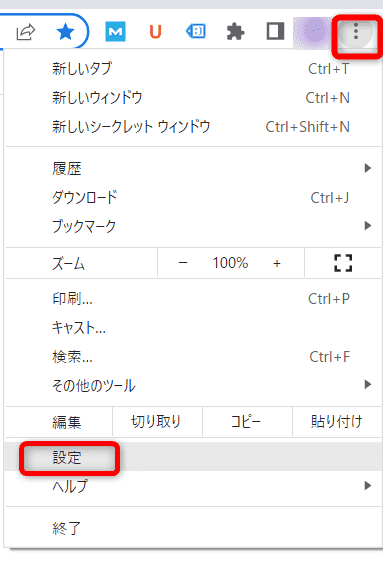
右上の「…」をクリック→「設定」をクリック
「言語」→「英語」→「Google翻訳を使用する」
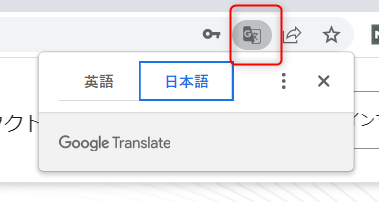
あとは、少し時間を置くと、サイトの上部にこのようなアイコンが出現しているはずです。

この設定をしておくと、全英語のThe Moneytizer(ザ・マネタイザー)サイトを日本語で見ることができます。
日本語翻訳が使えない場合を考えて、本ブログではあえて英語表記でお伝えしていきますね。
①The Moneytizer(ザ・マネタイザー)にアカウントを登録する
まずは、The Moneytizer(ザ・マネタイザー)にアカウント登録をしていきます。
1 The Moneytizer(ザ・マネタイザー)のアカウントを開設する
こちらをクリックすると、以下のような画面になりますので、空欄を埋めていきます。
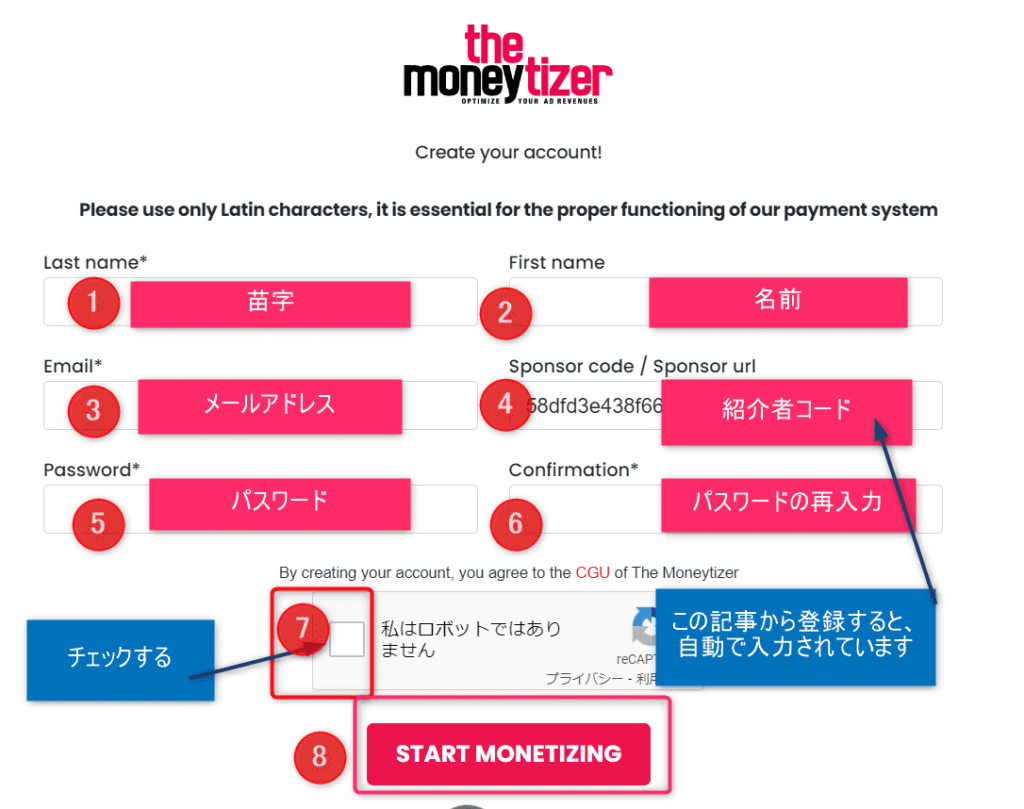
①苗字
②名前
③メールアドレス
④紹介者コード 紹介コードを入れると5ドルもらえます
このブログから登録される場合は、自動でコードが入っています。
入っていない場合は「21214f0cc52db79af0a49ca90284e2f6」入力をお願いします。
⑤パスワード
⑥パスワードの再入力
⑦「私はロボットではありません」にチェックを入れる
⑧「START MONETIZING」をクリック
2 サイト情報の入力
次は、このような画面になりますので、サイトの情報を入力していきます。
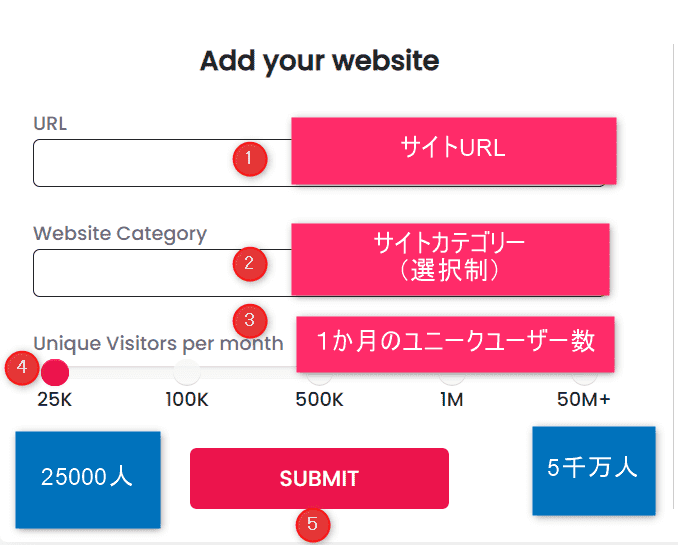
①ブログ・サイトのURL
②サイトのカテゴリー(詳しくは下の表を見てください)
③④1か月のユニークユーザー数(調べ方は下記画像をみてください)
⑤入力完了したら、「SUBMIT」をクリックする
サイトカテゴリーの選び方
| New / Media | ニュースメディア |
| Pets | ペット |
| Arts & Entertainment | アート&エンタメ |
| Automobile | 自動車、バイク |
| Business | ビジネス |
| Food & Beverage | 食べ物&飲料 |
| Low & Politics | 法律&政治 |
| E-commerce | 電子商取引、イーコマース |
| Education | 教育 |
| Employment | 雇用 |
| Family | 家庭 |
| Finance | 金融 |
| High Tech | ハイテクノロジー |
| Real-estate | 不動産 |
| Hobbies & Interests | 趣味 |
| Home & Garden | ホームガーデニング |
| Health & Wellbeing | 健康 |
| Science | 化学 |
| Sport | 運動、スポーツ |
| Style & Fashion | スタイル、ファッション |
| Travel | 旅行 |

わたしは育児系の雑記ブログ運営だったので、「Family(家庭)」を選択しました。
ユニークユーザー数の調べ方

アナリティクス→ホーム→ユーザー→概要
これで1か月のユニークユーザー数を調べることができます。
わたしの場合は「1万6767人」なので、「25K」を選択しました。
3 プロフィールを入力する
このような画面に変わりますので、「Skip for now」をクリックして飛ばしてください。
(あとでゆっくり設定します)
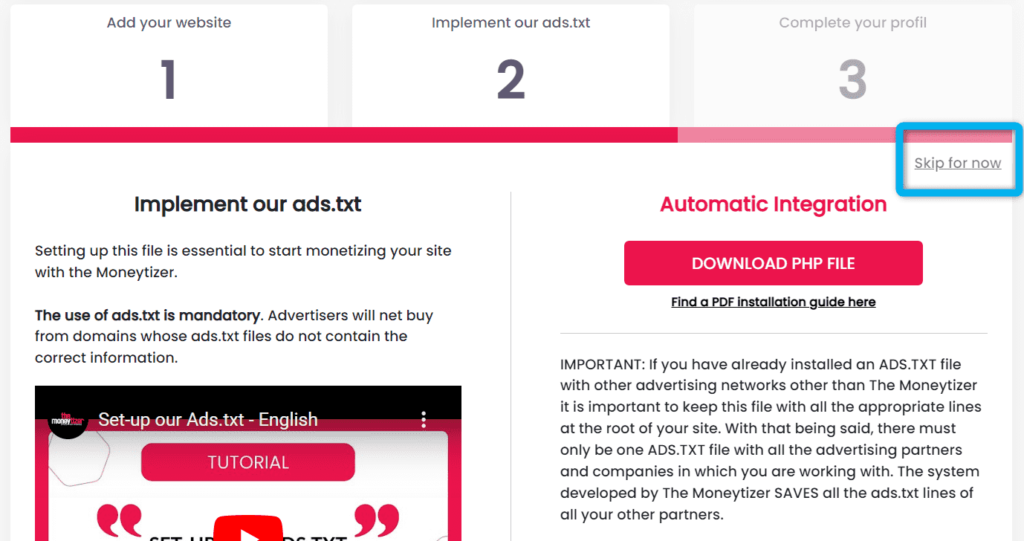
「Skip for now」をクリックすると、以下の画面になりますので、入力していきます。
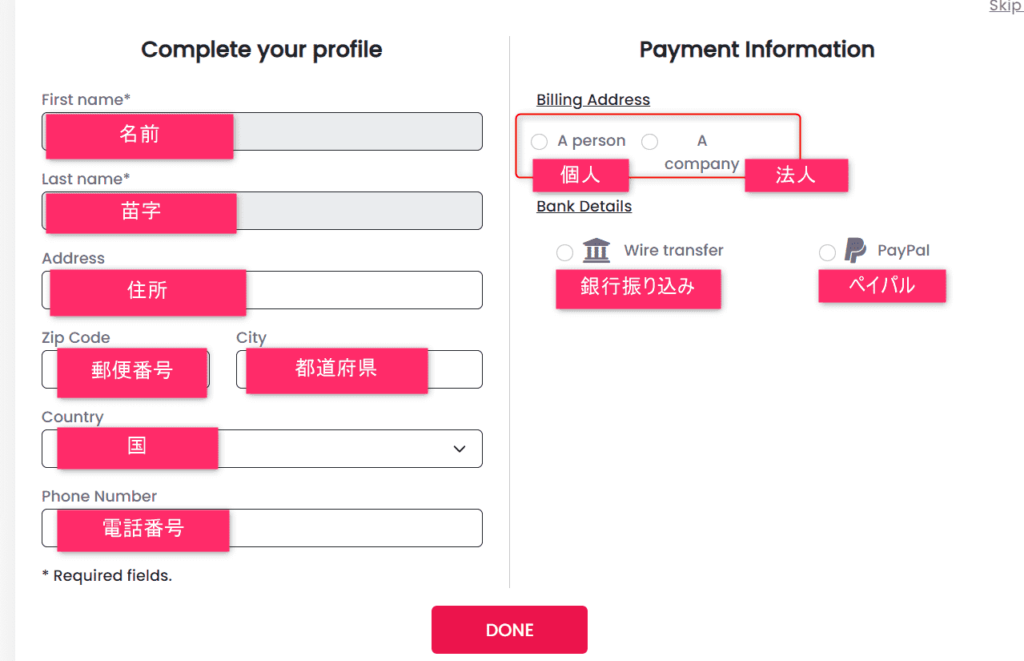
①名前
②苗字
③住所 このサイトを使うと、簡単に英語表記の住所の書き方が分かります。
④郵便番号
⑤都道府県
⑥電話番号
⑦個人か法人か
⑧振込方法
入力後「DONE」で完了
わたしは振込方法はペイパルにしました。
銀行振り込みだと、外国の口座が必要だそうで…
ペイパルがない方は、こちらから新規登録できます。
②ads.txtの設定をする
アカウント登録が完了したら、次は「ads.txt」の設定をします。
聞きなれない単語だけど、難しくないので大丈夫!
1 プラグインFile Managerをインストール
広告を貼りたいブログのダッシュボードから、File Managerをインストールして有効化してください。
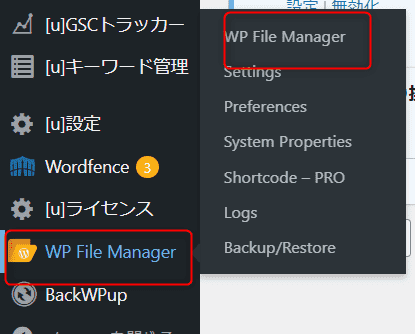
次は、File Managerを下記のように開きます。
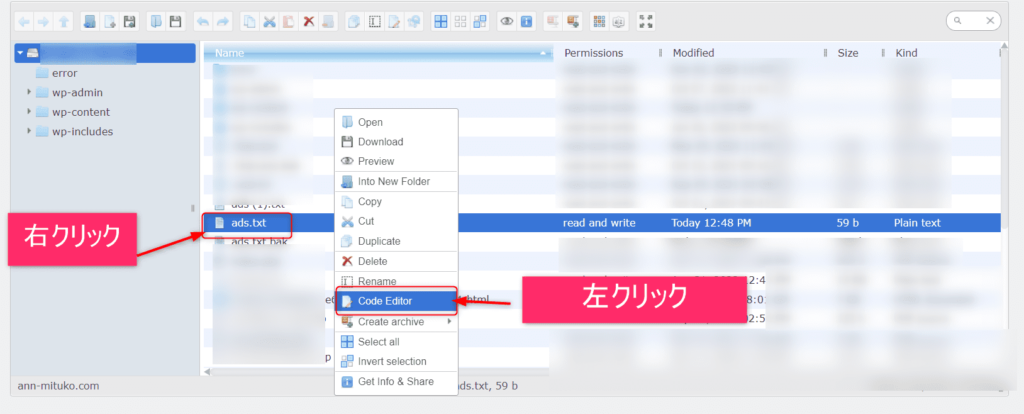
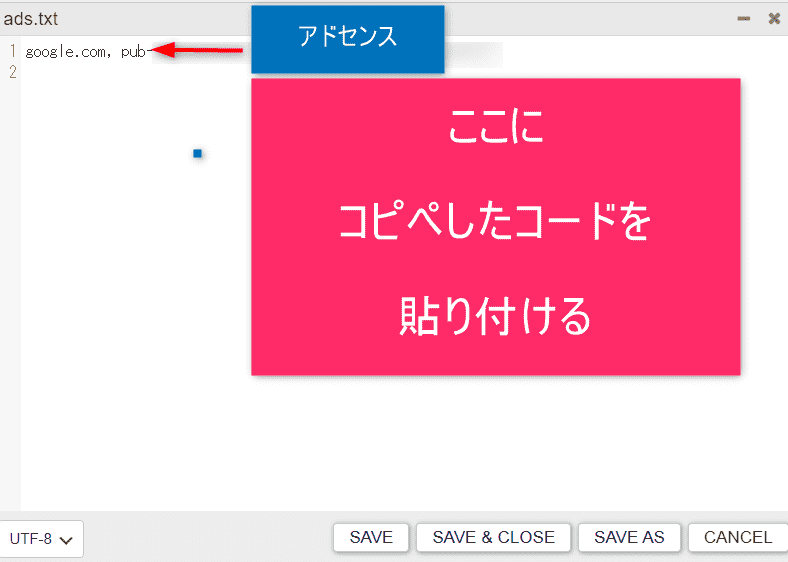
すると、以下の画面になりますので、「ads.txt」を右クリックし、「Code Editor」を左クリックしてください。
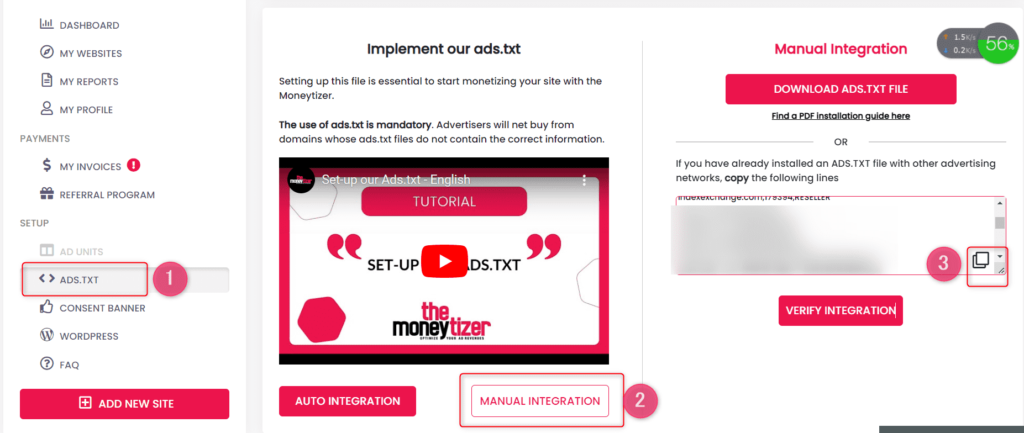
2 The Moneytizer(ザ・マネタイザー)画面にてコードをコピーする
次は、The Moneytizer(ザ・マネタイザー)の「ADS.TXT」→「MANIUAL INTEGRATION」→にて出てきたコードをコピーします。
3 コピーしたコードをFile Managerに貼り付ける
コピーしたコードを、ブログのFile Managerに貼り付け、「SAVE&Close」をクリックします。
4 設定の確認
The Moneytizer(ザ・マネタイザー)の「VERIFY INTEGRATION」をクリックして、以下のメッセージが出れば設定成功!
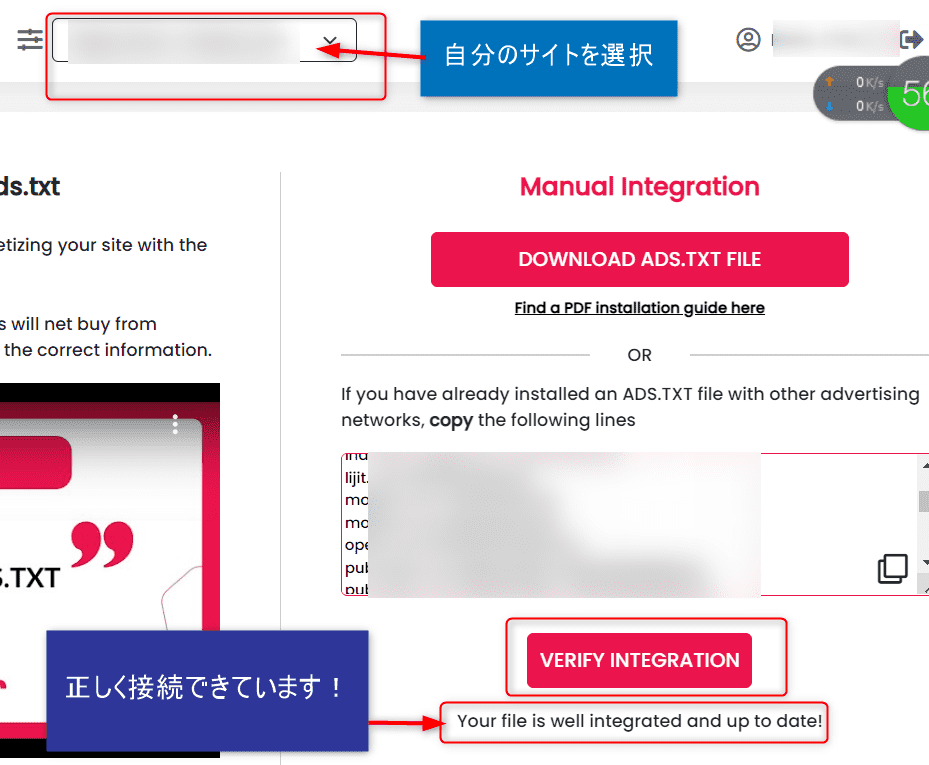
設定成功後は、File Managerのプラグインは削除してもOKです。
③CMP設定をする
最後に、CMP設定をすれば、広告準備が整います。あと一息頑張りましょう!
1 The Moneytizer(ザ・マネタイザー)にてコードをコピーする
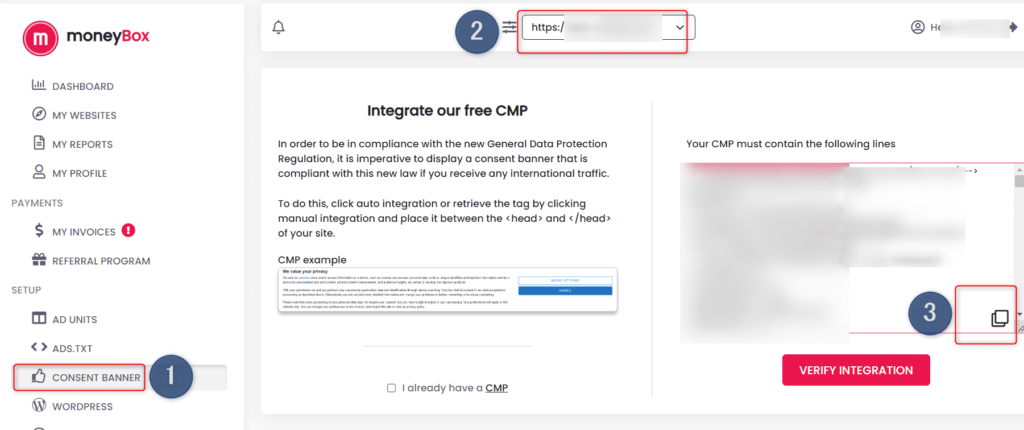
The Moneytizer(ザ・マネタイザー)を開き、「CONSENT BANNER」→自分のサイトを選択→コードをコピーと進みます。
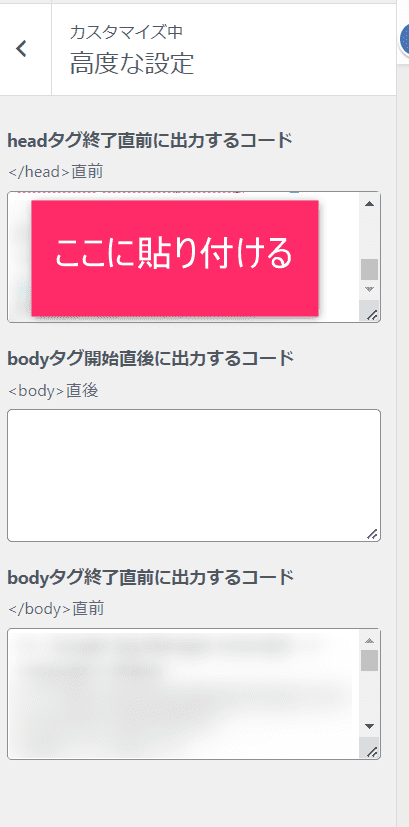
2 ブログの<head>~</head>内に貼り付ける
先ほどコピーしたコードを、ブログの<head>~</head>内に貼り付けていきます。
わたしはブログテーマSWELL・サーバーはConohaを使用しているので、以下のように貼り付けました。
外観→カスタマイズを開く
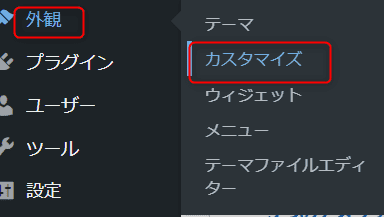
ブログダッシュボードから「外観」→カスタマイズとすすみます。
高度な設定からhead部分に貼り付ける
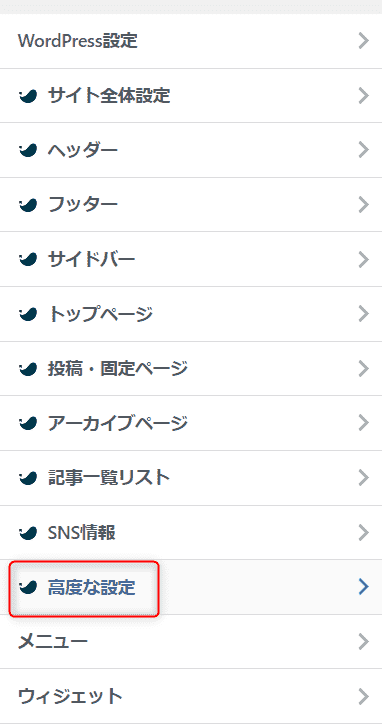
「高度な設定」をクリックします。
すると、以下の画面になるので、コピーしたコードを貼りつけます。
「公開」を押す前に、サーバーのWAF設定を一瞬だけオフにします。
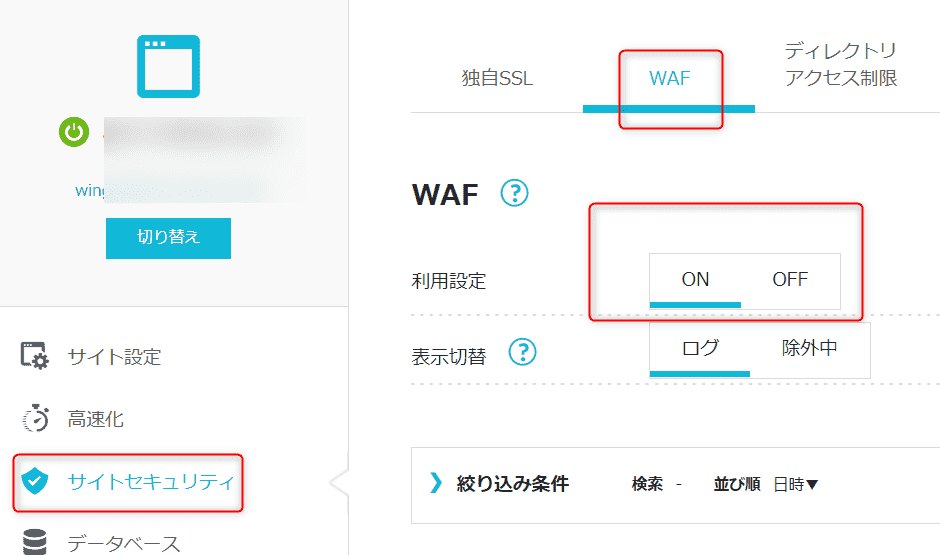
Conohaの場合は、サイトセキュリティ→WAF→OFF
カスタマイズ画面の「公開」を押したら、またすぐにWAFはONに戻してくださいね
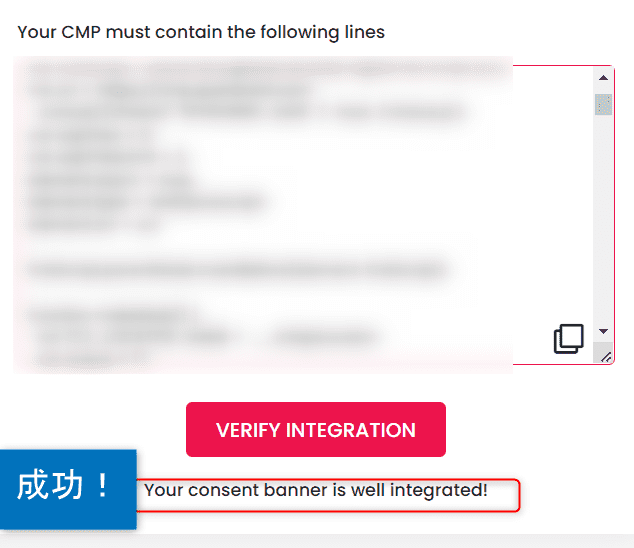
3 設定の確認
コードの貼り付けが終わったら、設定がうまくいったか確認してみましょう。
The Moneytizer(ザ・マネタイザー)に戻り、「VERIFY INTEGRATION」をクリックして、以下のメッセージが出れば、設定成功です。
これにて全ての設定は完了です!お疲れ様でした
まとめ|全ての設定が完了したか確かめよう
ここまでアカウント登録、ads.txtの設定、CMPの設定お疲れさまでした。
「MY WEBSITE」をクリックして、以下の画面になっていれば、全ての設定が完了しています。
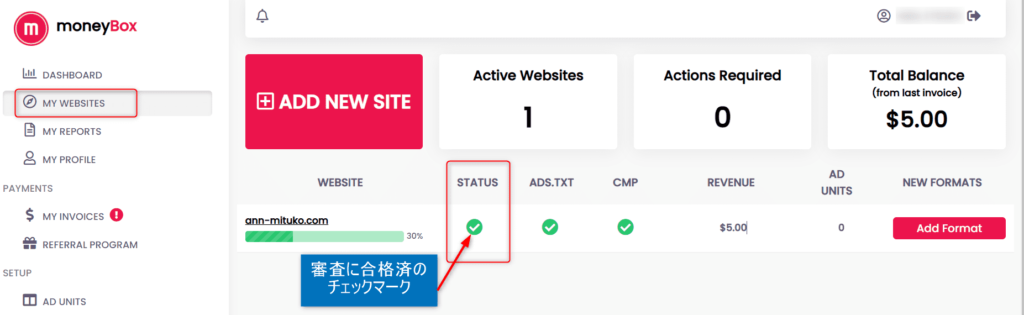
チェックマークが全て緑になっていれば、広告を貼る準備が整っているよ!
サイト審査は、わたしの場合24時間以内に完了していました。
\今なら審査通過だけで5ドルもらえます/
サイトの審査に合格した方は、広告を貼っていきましょう。
The Moneytizer(ザ・マネタイザー)の広告の貼り方はこちらをご覧ください。
お読みいただき、ありがとうございました。